
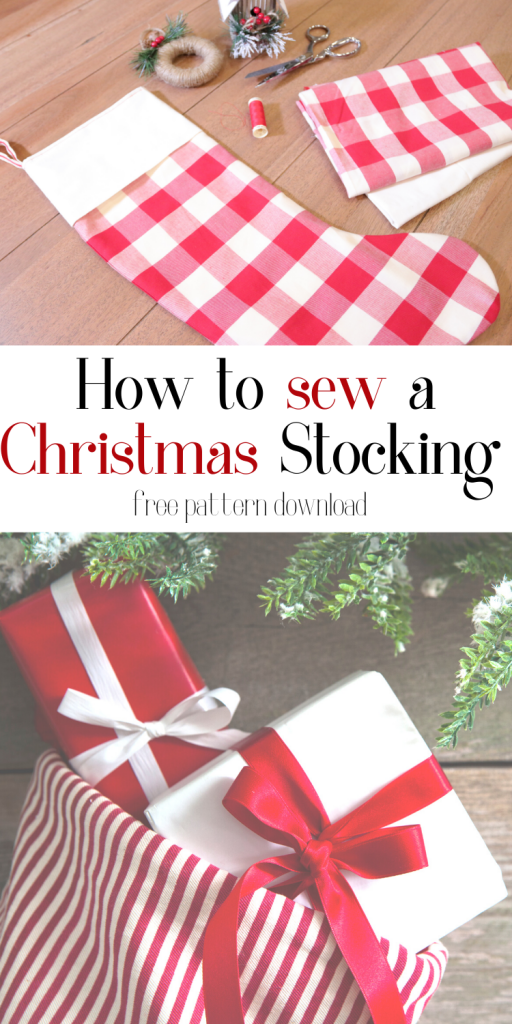
How to Make a Lined Christmas Stocking
Learn how to make a lined Christmas stocking with this simple sewing tutorial.

Christmas traditions are precious. Part of the excitement of Christmas morning is running to see what Santa has put in your stocking. I still have very fond memories of doing this as a child. I still have the homemade Christmas stocking my mom made me the year I was born. It’s the stocking I still use and treasure to this day.
Want to make personalized stockings for all of your loved ones this holiday season? Well let me show you how easy it is.
Some of these links are affiliate links. You can read my full disclosure HERE.
Today I’m going to show you how to make a lined Christmas stocking with a cuff. This is a beginner-friendly sewing project with lots of opportunities to personalize.
Grab your supplies, and let’s start sewing! Santa will be here before you know it!
Why make your own Lined Christmas stockings?
There are a lot of reasons why you might choose to make your own Christmas stockings so let’s go ahead and list off a few here.
For starters, there’s really something so special about making something with your own hands. Creating a pattern from a few bits of paper, picking the perfect fabrics, then constructing something you’ll use year after year during Christmas time.
Unlike a lot of people, I don’t buy a new store-bought stocking each year for every member of my family. I prefer to use the ones that I’ve made myself. Call me old-fashioned I guess but there’s something special in the handmade decorations.
Handmade Christmas stockings also make great gifts and are totally customizable. You can make from old pieces of well-loved clothing, choose a fabric that you know that person you are gifting to would love, and even embroider a name on the top band of the stocking.
How To Make A DIY Christmas Stocking Sewing Pattern
Making your very own Christmas stocking pattern is very simple. Today I’ll be showing you how to make a pattern from a stocking you may already have, or you can feel free to download the pattern I created for this tutorial.
Both are very simple to do. If you don’t happen to have a stocking to use for a pattern, you can also borrow one from a friend or family member to trace. You can also head to your local thrift store and grab one for a couple of dollars.
DIY Lined Christmas Stocking Video Tutorial
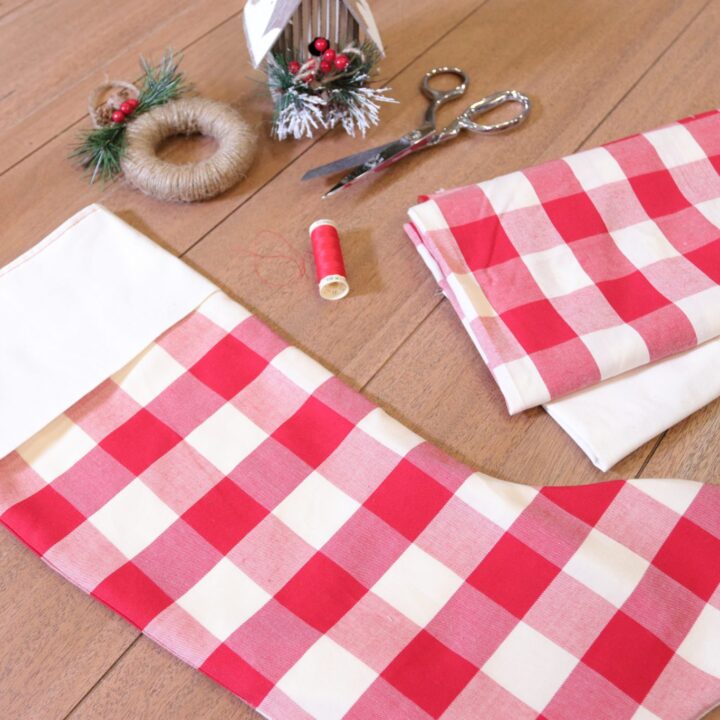
Supplies
Let’s go over what you’ll need to sew these simple stockings.
- You’ll need an old stocking (for a pattern) or the pattern I provided above. Either will work for this tutorial.
- Fabric. You’ll want some fabric for the exterior, coordinating fabric for the lining of your stocking.
- A piece of fabric for the band around the outside.
- Ribbon or a small scrap of fabric that you can make a loop to hang your stocking from.
- Sewing machine.
- Thread (contrasting or coordinating-it’s up to you).
- Scissors.
- Iron.
- Pins or clips (optional-but I prefer to have them).
- Cutting Mat (optional if you have a safe cutting surface).
Ideas to personalize your DIY Christmas stockings
- Use old pieces of clothing. Now I’m in no way suggesting cutting up perfectly good clothing. But repurposing clothing that no longer fits or suits your taste instead of sending it to the thrift store is a great way to get some fabric-especially on a budget. It also helps keep clothing from landfills.
I really love repurposing old clothes for small sewing projects.
2. Buy a themed fabric that you know the person you are making the stocking for or gifting to will love.
3. Have a custom fabric made for your stockings. Websites like Spoonflower.com make some really fun fabrics and you can send them pictures to have fabric printed for you. Just note this can get pricey depending on the fabric base you select.
How to make a DIY lined Christmas stocking
Download the pattern or get a stocking you’d like to use as a pattern.
If you are using an old stocking for your pattern, you can skip the downloading part.
Begin by downloading your FREE pattern if that’s what you’re going to want to use. Cut out the pattern pieces (4 separate pieces of paper) and tape them together accordingly.
NOTE: When printing your pieces, make sure you print to scale and NOT at 100%. Otherwise, the pieces really won’t fit together.
Match up the lines the best you can and tape. Once you have this done you are ready to cut out your fabrics.
Selecting the fabrics for your Christmas Stockings
You can pretty much use any fabrics you want to construct your stockings. I typically use 100% linen or quilting cotton but the flannel fabric is also really nice. You’ll need a fabric for the exterior, fabric for the interior as well as for the band on the outside.
I really enjoy picking fabrics for my projects-one of my favorite steps of the whole creative process is putting colors and prints together. SO have fun with it!
Now is a great time to check your local big box craft stores for holiday printed fabrics and themed fabrics too. Most of them have these fabrics 50% off!!
Don’t forget to take your coupons for an extra discount (applicable at certain stores only).
Cut out your exterior and lining fabrics
- For the exterior and lining fabric, fold or place your fabric pieces RST (right sides together).
- Place your Christmas stocking pattern onto the exterior fabric first. Pin in place.
- Once your pattern is pinned to your exterior fabric, cut out your pieces leaving 1/4 to 1/2 inch seam allowance all the way around as you cut. If you don’t leave a seam allowance and choose to cut right along side the pattern, that’s fine too. Just know that your stocking will be slightly smaller then what mine was.
- Repeat the same steps for the lining fabric. Use the same seam allowance as you did for your exterior fabric.
- Once you have finished cutting the main stocking pieces you should have (2) from the exterior fabric and (2) pieces from the lining fabric.
- Decide on a fabric for the top band of your Christmas stocking. You can use a coordianting print, plain fabric or a contrasting print.
- Once you have selected a fabric for the band of your stocking. Cut a piece that is 11 inches high. The length of the pieces will be determined by the width of your stocking at the top. Take that measurement, double it, and then add another 1/4 or 1/2 inch (for the sewing seam allowance. *Whatever seam allowance you left when you cut your pattern is what you’ll want to use*
- Take a piece of ribbon that you want to use for a hanging loop and cut to 8 inches. Set aside.
- Now that all your pieces have been cut. Let’s pin.
Pin the Christmas stocking pieces together
- Leaving the exterior (2) pieces of your stocking RST (right sides together), pin or clip them togther so they don’t shift during sewing.
- Repeat this step for the lining (2) pieces as well.
- Fold the band fabric piece RST and pin along the 11 inch side only.
Seam allowance for the FREE Christmas stocking sewing pattern
- 1/2 inch
Use a 1/4 inch or 1/2 inch seam allowance.
I personally prefer using a 1/2 inch for this pattern but 1/4 inch will work as well.
*Just be consistent with the seam allowance you use. If you choose to use 1/2 inch, make sure you use the SAME seam allowance for the entire project.
Sewing the EXTERIOR of your DIY lined Christmas stocking
- Start with the (2) exterior pieces of your Christmas stocking pinned right sides together.
- Sew using 1/2 inch (or 1/4 inch) seam allowance all the way around the sides of your stocking. Be sure and leave the top OPEN. Do NOT sew this shut.
Sew the LINING of your stocking
- Repeating the same steps you did for the EXTERIOR of your stocking, leave the pieces of the lining pinned right sides together and sew along the sides using the SAME seam allowance you did for the exterior.
- Be sure and leave the top of the stocking liner OPEN as well. Do NOT stitch this closed.
Sew the top band of the stocking
- With the 11 inch sides of the top band pinned right sides together, sew a seam using the same allowance you have been using to sew your stocking.
- Once this seam is sewn, gently press the seam open.
- Now fold your band wrong sides together and press.
- Set the band aside.
Assemble the Christmas stocking
- Turn the EXTERIOR of your sewn stocking right sides out. When this stp is complete, you should be staring at printed side of your fabric.
- I recommend giving your stocking a press to make sure the seams are nice and flat. If you prefer not to iron, that’s ok too. You’ll really only need to do this step for the EXTERIOR.
- At this point you can trim down your seam allowances to eliminate some bulk on your seams but this step is optional and will not affect the appearnance of your finished stocking.
- Leaving the lining of your stocking as sewn, insert the lining into the exterior of your stocking.
- Be sure the seams from both pieces of your stocking (exterior and interior) are together as best as you can.
- Pin around the top band of your stocking. This will keep the lining and the exterior from shifting. You will have a raw edge at this point, but don’t worry, you won’t see it when your stocking is finsihed. I promise.
- *This step can be omitted if you are a confident sewer* Using a basting stitch, baste around the top edge of your stocking using a 1/4 inch seam allowance. Remove the pins or clips as you come to them.
- You should now have the interior of your Christmas stocking sewn inside the exterior of your stocking.
Attaching the band of your stocking
- Grab the band of your stocking that you stitched and pressed together previously. It’s time to attach it to your stocking.
- Insert the band of your stocking INSIDE the stocking, matching up the raw edges of the band to the basted raw edge of your stocking body. Be sure to match up the sewn side seam of your band and the side seam of your stocking. If this step seems confusing, refer to this step in the video tutorial.
- Now grab your 8 inch piece of decorative ribbon and fold it in half. Again, matching up the raw edges of the ribbon.
- Carefully place the ribbon loop side down, on the side seam between the band of your stocking and the lining of your stocking. The raw edges of the ribbon should be sticking out and past the top edge of the stocking 1/4 inch or sew. This is to ensure that you catch the ribbon when sewing the band on your stocking.
- Pin or clip around the entire top edge of the stocking, making sure the loop of ribbon doesn’t shift (I pin this first).
- Once the band, hanging ribbon and stocking are all pinned together, it’s time to sew.
Sew your DIY Christmas sock together
*Remember to return your sewing machine stitch length back to the normal stitch length setting after previously basting. If you haven’t done so already*
- Using 1/2 seam allowance, sew completly around the top band of the stocking where you previously pinned. This is going to attach the band to your stocking.
- Once you have finished sewing, trim your threads and press (if needed).
- Pull the band from the center of your stocking and fold it out and over the outter body of the stocking. This step is going to hide that raw edge under the band.
Optional topstitching on the stocking band
- If your sewing machine has a decorative stitch, you can definitely sew around the top edge of your stocking. You can also do this with a straight stitch as well.
- Do you want to personalize your Christmas Stockings? Consider embroidering a name and year on the band or use an embroidery machine for this step.
Your Christmas stocking is now complete.
DIY Lined Christmas Stocking
Materials
- (2) pieces of fabric for the exterior
- (2) pieces of fabric for the lining
- (1) piece of fabric for the top band
- 8 inch piece of decorative ribbon (for hanging)
Tools
- FREE pdf Christmas Stocking Sewing Pattern (www.homemadeonourhomestead.com)
- Scissors or rotary cutter
- Sewing machine
- Thread (coordinating or contrasting)
- Iron
Instructions
- Select fabric for the exterior of your stocking, the lining, the top band as well as the hanging loop.
- Download and print your copy of the FREE pdf sewing pattern (link provided). You can also use an existing stocking you have at home to draft your own sewing pattern as well.
- Cut out and piece your pattern together.
- Fold the exterior fabric for your stocking right sides together.
- Pin your stocking pattern to the fabric and cut it out. Be sure and leave 1/4 inch to 1/2 inch seam allowance when cutting out around the pattern. You can also just cut the pattern out without leaving an added seam allowance. It's up to you.
- Repeat step number 5 for the lining fabric as well. Be sure and leave the same seam allowance you did above as well (if applicable).
- Cut out a piece of fabric for the stocking band. 11 wide (length will be based on how you cut out the body of your stocking plus 1/2 inch seam allowance).
- Pin the exterior of your stocking right sides together.
- Pin the interior (lining) of your stocking right sides together.
- Fold the band of your stocking in half (width-wise) and pin along the 11-inch side.
- Thread your sewing machine.
- Sew the exterior of your stocking together using 1/2 inch seam allowance. Be sure not to sew the top of your stocking closed.
- Trim down the seam allowance around the body of your stocking (optional).
- Turn the exterior body of your stocking right side out and press. Set aside.
- Sew the interior lining of your stocking right sides together using 1/2 inch seam allowance.
- Trim down the seam allowance of your stocking lining (optional).
- Insert the lining (as is) into the exterior shell of your constructed stocking body. Be sure and match up the seams at the top.
- Using a basting stitch, carefully baste the top edge of the stocking exterior and interior together using a 1/4 inch seam allowance. Do NOT trim seam allowance for this step. Set aside.
- Sew 1/2 inch seam allowance down the 11 inch side of the top stocking band.
- Press seam open.
- Carefully fold down one long edge of your band to meet the other raw edge of the band. Matching up the seam. Press.
- Cut 8-inch piece of ribbon for your hanging loop. Set aside.
- Take the band of your stocking and carefully place it inside your stocking. Be sure to again match up the seams.
- Fold the ribbon in half matching raw edges.
- Carefully place your folded piece of ribbon, loop side down between your stocking body and the band on the side seam.
- Pin around the top edge of your stocking. All the way around. Be sure the ribbon doesn't shift when pinning. Pin that fist if possible.
- Sew using 1/2 inch seam allowance around the top raw edges of your DIY-lined Christmas Stocking. Be sure to backstitch at the beginning and the end of your stitching.
- Trim threads.
- Now pull the top band of your stocking out and fold it over the exterior of your stocking. You should now see the loop sewn in between the two pieces. This is how you will hang your stocking by the fireplace with care.
- Give your stocking a quick press (if so you desire).
- Your DIY Christmas Stocking is now complete!
OPTIONAL Personalization Options:
1. Hand embroider a name and year on your stocking for a little extra personalization.
2. Use an embroidery machine to embroider a fun design or message on your stocking.
3. You can also take your stocking(s) to an embroidery shop to have this done as well.
Notes
This is a very beginner-friendly sewing project. Sew along video tutorial available at www.homemadeonourhomestead.com
Happy Holidays everyone!
Check out the full Christmas tutorial playlist
 Subscribe to my channel
Need a quick gift idea for Christmas? How about this Kitchen Apron.
Watch the tutorial and find the pattern and post HERE!
I hope you all have a very blessed holiday season with family and friends.