Homemade Water Kefir & Benefits
Learn how to make a delicious, probiotic-rich homemade water kefir and explore its amazing health benefits.
Water kefir is so simple to make, so let me show you how.
If you are interested in having a really bubbly beverage, make sure you follow the steps to do a second fermentation.
Some of these links are affiliate links. You can read my full disclosure HERE.
What Is Water Kefir?
Water kefir is a probiotic-rich drink that is made by the process of fermentation. Using a starter culture (kefir grains), filtered water, and sugar, you can create a gut-healthy soda in a matter of days.
There are many benefits of water kefir. For starters, it’s loaded with probiotics. Probiotics are extremely healthy for your digestive system. They say health starts in the gut, so why not drink things that support it naturally.
Water Kefir Grains
Water kefir grains are not actually “grains” at all. They are clear polysaccharides. This simply means a bunch of sugar molecules that have formed a crystalline shape.
These polysaccharides feed on sugar and multiply.
When making batches of water kefir, you will notice that after straining the grains from the liquid, you will have quite a bit more than when you started.

Water Kefir Benefits
Gut Health
Water kefir is loaded with beneficial bacteria. Most of the time you will hear these referred to as “probiotics.”
Probiotics have been said to boost immunity, help decrease the risk of certain types of cancer, and increase the health of your gut. Increased gut health help the overall health of all bodily systems.
The best way to add probiotics to your diet is by eating or drinking things that are packed full of naturally occurring, healthy bacteria. Kefir, kombucha, kimchi and sauerkraut to name a few.
Water kefir alone can contain up to 55 different strains of probiotics. Isn’t that amazing?!
Healthy Hydration
Unlike the highly marketed “hydrating electrolyte beverages,” water kefir is extremely healthy for you. The bacteria and yeast (what the kefir grains are made up of), feed off of the sugar and filtered water to create a beverage that’s packed full of hydrating and nourishing goodness.
It is so important to stay hydrated. Hydration helps maintain proper body function for all our systems-circulatory, nervous, digestive, and cardiovascular (to name a few).
Staying hydrated can help improve sleep, lubricate your joints, and help prevent infections (source).
The human body is made up of 60% water-so it’s really important to make sure you have adequate water intake to keep things functioning properly. The primary ingredient in kefir is water. So there you go. Kefir is also low in calories and more refreshing than a plain glass of water.
The kefir grains eat most of the sugar in the soda, and what you are left with is a glass that is full of healthy bacteria.
Thankfully, water kefir and kombucha both have become increasingly popular over the years making them fairly easy to find at your local supermarket.
Immune Boosting Properties
Like many other fermented beverages, kefir is full of immune-boosting properties.
Water Kefir Is Dairy-Free
When people think of fermented drinks and food, they usually go right to things like yogurt, milk kefir, and raw cheddar. But just like kombucha, water kefir is dairy-free.
People with allergies or sensitivities to dairy, or that eat a vegan diet, can drink water kefir without any issues because it is made up of filtered water, kefir grains, sugar, and fruit (if you do a second ferment).
Water Kefir Health Benefits
Sourdough, kombucha, sauerkraut, kimchi, and kefir all contain probiotics. Making your own at home has so many benefits such as:
- Shortens the supply chain
- Controlling the quality of the ingredients used
- Determining the length of fermentation based on taste preference
- Experimenting with flavors and combinations of flavors (the really fun part of home fermentation)
When it comes to making my own kefir and kombucha, I prefer a second fermentation for both.
Second Fermentation
So by now, you may be wondering if a second fermentation is necessary before you can enjoy your water kefir soda.
Absolutely not.
After a single fermentation, you can definitely drink your homemade water kefir. I prefer a second ferment so I can try out new flavors. Plus, adding in fresh organic fruit or fruit juice, and fermenting a bit longer will only add more healthy bacteria to your brew.
The longer you ferment, the more bubbly your kefir will become. The same goes for kombucha.
Tips For Making Water Kefir
- Kefir grains will multiply very quickly. Whether in milk (milk kefir) or when used to make water kefir. You can feed the overage of grains to your chickens, pigs, or other livestock. You can also blend them into smoothies for added probiotics or eat them as they are.
- Be sure that the sugar water has completely cooled to room temperature BEFORE adding in your kefir grains. High heat can kill the good bacteria in the grains.
- If you prefer your drinks really carbonated, consider fermenting a second time.
- Add fresh fruit or organic fruit juice to the second ferment to have a fruit-flavored soda.
- Be sure that you are using filtered water when making all your ferments. Chlorine in tap water can damage kefir grains and kombucha scobys.
- Check your local thrift stores for supplies. I have found some really great one-gallon jars as well as flip-top bottles at my local thrift shop.
- Ask friends if they have grains to share. If you can get some kefir grains from a friend, you won’t have to buy some to get started.
Water Kefir Without Sugar?
It is possible to make water kefir without sugar. Coconut water kefir is another really healthy alternative that can be found at most health food stores. It can be quite a bit more expensive than regular water kefir so this is something to keep in mind if you’re thinking about trying it.
Water Kefir vs. Kombucha
- Brewing water kefir is much faster than brewing kombucha. A batch of kefir will take 24 to 48 hours of fermentation time, whereas kombucha can take 7-14 days per batch.
- Good to brew in small batches. No need to make massive amounts if you don’t need it.
- Water kefir can have up to 400 different types of organisms to boost gut health as well as immunity.
- It’s not as sour as kombucha. Some people love how pungent kombucha can be, while others do not. I think that water kefir is a really happy medium that most people enjoy.
- Kefir is dairy-free, caffeine-free, and vegan-friendly.
- Water kefir grains reproduce quickly which makes them perfect for sharing with friends, family, or your livestock (my chickens love them).
Some of these links are affiliate links. You can read my full disclosure HERE.
Supplies For Homemade Water Kefir
Both of the kefir starters will produce the same result. You only need one to get started.
- Filtered Water (I use a Berkey water filter, but filtered water from the store is fine too)
- Flip-Top Bottles (clear glass or amber glass) (for second fermentation and storage of finished kefir)-optional, but really helpful
- Cloth Cover (or you can make your own fitted cover)
- Funnel
How Much Kefir Water Can I Drink?
Most people can easily enjoy 1 to 2 glasses of kefir a day without issues. If you have never had kefir or kombucha before, I would recommend starting off with one.
Sometimes with fermented foods or beverages, people can experience digestive upset. Another good reason to start off with a little, and work up to more.
Because this is a fermented beverage, trace amounts of alcohol are present. This is similar for all ferments.
How To Make Water Kefir Soda
Step 1: Purchase Kefir Grains Or Water Kefir Culture
- Purchase some water kefir grains or a kefir starter culture. Both of these work well.
If you have a family member or friend that brews kefir, you can also get some grains from them. They multiply quickly, so a couple of Tablespoons is all you need to get started.
Kefir grains are alive, so be sure and take care of them. Simply put, if you order grains through the mail, get them out of the mailbox as soon as you can and get a batch of water kefir going. The grains need food (sugar) to stay alive and thrive.
Step 2: Prepare The Sugar Water And Allow It To Cool
- Bring 2 cups of filtered water to a boil. Add 1/2 cup organic cane sugar to the water and mix well until dissolved. Allow mixture to cool completely. This is very important.
- High heat can kill your kefir grains.
Step 3: Add In Kefir Grains Or Kefir Culture
- Add 1/2 cup of kefir grains to a half-gallon jar. If you are using the powdered culture, follow the recommended steps on the back of the package for the best results.
- Fill jar 3/4 full with filtered water.
Step 4: Put Ingredients To The Brewing Jar
- After your cane sugar and filtered water mixture is cooled, add it to the half-gallon jar with the kefir grains and other filtered water.
- Stir to incorporate. The kefir grains will sink to the bottom of the jar. This is normal.
Step 5: Fermentation Timing
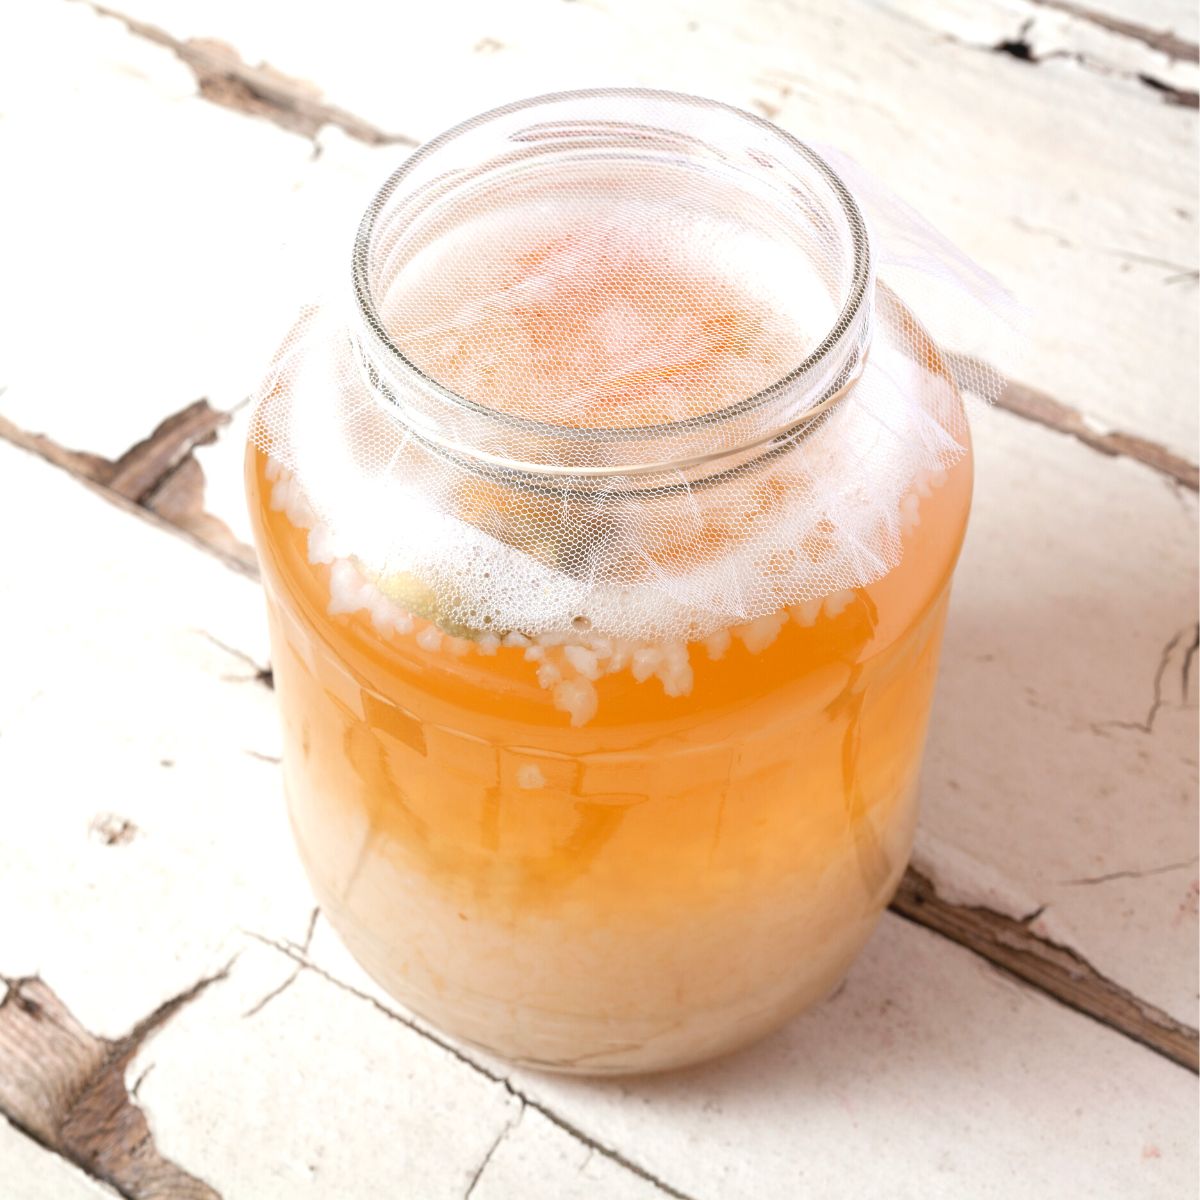
- Place the lid on loosely, or cover it with a tea towel and secure it to the jar with a rubber- band.
- Allow it to sit on the counter at room temperature for 24 to 48 hours. I prefer to sneak a little taste after 24 hours to determine if I want to ferment longer. This is all based on personal taste preference. I prefer my kefir sour, so I ferment it longer. A bit sweeter, ferment for a shorter period of time.
When it comes to making fermented drinks (and food), there are a lot of variables. Things such as the temperature in your house, and where you leave your ferments to sit (dark cupboard or countertop) all affect how long things take to ferment to your taste preference.
Be flexible and learn to experiment. You can’t really mess it up.
Step 6: Strain your kefir grains
- After 24 to 48 hours (or when your taste preference has been reached), use a fine mesh strainer and strain the liquid and your kefir grains.
- Be sure and save the grains to make another batch. Store in a glass jar with some sugar water mixture when you don’t want to brew.
Step 7: Second Fermentation (optional but highly recommend)
Buy some flip-top bottles. You can use clear glass or amber glass. Either will work. I prefer clear glass so I can watch my ferment more closely. Amber glass also tends to be a bit more expensive, so that’s something to consider. Shop around.
Again, I’ve had great luck finding these bottles at my local thrift store. So don’t forget to check there if you’re looking to save some money getting started.
- Add 1/4 to 1/2 cup of fresh diced fruit or fruit juice of your choice to your flip-top bottle. No need to be exact.
- Fill each bottle to about 3/4 full with strained water kefir using a funnel.
- Close the flip-top bottle and allow it to sit at room temperature for another 24 hours. This is going to allow the good bacteria in the water kefir to feed off the sugars in the fruit or fruit juice you added, therefore building carbonation in your drink. This is when your water kefir will become really bubbly. This happens during the second fermentation.
Step 8: Enjoy!
After completing a second ferment, be sure to slowly open up your flip-top bottle. I prefer to always do this step over the sink to avoid it potentially going everywhere.
Certain juices tend to cause an extreme amount of carbonation (based on sugar content) and can make a real mess if the bottles are opened too quickly. Trust me on this.
If your flip-top bottle doesn’t make a “pop” sound when you are opening it, it likely hasn’t fermented long enough. Close it up and allow it to rest on the counter longer.
I prefer my water kefir and kombucha to be really bubbly. The longer it ferments, the more bubbly it will become.
Again, this second ferment step is totally optional. So if you really don’t like an overly bubbly beverage, you can enjoy it after the first fermentation.
Water Kefir Fermentation Considerations
- If you have been making water kefir for a while, your jar may be full of grains. The more kefir grains you have in a batch of water kefir, the faster your kefir soda is going to ferment. Taste frequently, or brew with a smaller amount of grains. I prefer to use the same amount with each batch I brew to help with consistency.
- The hotter it is in your house, the quicker your kefir will ferment.
- Keep your kefir (and any ferment) out of direct sunlight. This can also cause it to ferment faster, as well as mold.
- If you leave your kefir on the counter for days and have forgotten about it, don’t worry. While that particular batch may not have the taste you like, you can dump out the liquid and start a fresh batch using the kefir grains. They are still alive and can be used to make more.
- The end result will likely be something you can drink and enjoy. You can always add a bit more sugar water mixture to an overly sour batch and let it sit for another 12 hours or so to achieve something delicious.
More Fermented Recipes
- Sourdough Banana Pumpkin Bread (or muffins)
- Salsa (ferment on the counter for some lactose-fermented benefits)
How Long Does Water Kefir Last?
After you have strained your kefir grains and put your finished brew into the flip-top bottles, it will last for a couple of weeks in the refrigerator. Although, I doubt it will last that long…It’s so delicious!
If you love this recipe, make sure you share it with your friends and family.
Shop Water Kefir Supplies
- Water Kefir Grains
- Kefir Powdered Starter Culture (either form of starter culture is fine)
- Organic Cane Sugar
- Half Gallon Brewing Jar
- One Gallon Brewing Jar
- Temperature Strips (optional)
- Flip-Top Bottles (amber glass)
- Flip-Top Bottles (clear glass)
Use either 16-ounce or 32-ounce bottles.
- Juice or fresh diced fruit (optional for the second ferment)
- Tea Towel or Cloth Jar Cover (my favorite)
- Wooden Spoon
You can shop my entire Amazon storefront which has a list of all these supplies in one easy-to-find place.
Don’t forget to print a copy of the recipe so you have it for later.
Happy fermenting!